Game 2 - Empire - Dawn Attack
I have found out that Dawn Attack can be one of these scenarios that can throw any plans out of the window before the game started. Random deployment is bad not only because some of the regiments might end up on the wrong flank but also that they all might show up in the middle. With not enough space to deploy properly. On top of that I faced Empire, with their 1+ armor all around :)
Empire - Army List
Archlector on War Altar
Wizard Lord, Level 4 - Lore of Life
BSB
Wizard, Level 1 - Lore of Light
40 Halberdiers, Full Command
2 x 8 Archers - Detachments
5 Inner Circle Knights, Full Command
5 Knights
4 Demigryphs
4 Demigryphs
Hurricanum
Steamtank
Cannon
My new opponent, Jerry, had a quite compact army list with some interesting choices. There were some units which are kind of typical to what I have seen so far but with a few new additions. At least for me. I have faced similar empire army before but with cavalry bus, hellblaster and Heavens Lore. New thing was Altar and Hurricanum, a very efficient combination as it grants 3+ to hit and hatred to nearby units.
A lot of 1+ armor save regiments was bad news for me too. I also knew from prior experience how tough demigryphs are, even more so with their T4 now. I had to isolate them to have a chance to win against them. Also a steamtank is always a problem. Fortunately I didn't have to face too many artillery pieces. With so many characters in a single infantry unit I wanted to attempt an assassination with my heavy cavalry, especially with prior flames and vauls to thin the enemy down (or wound the characters) and to switch off ward saves (provided I get the spells).
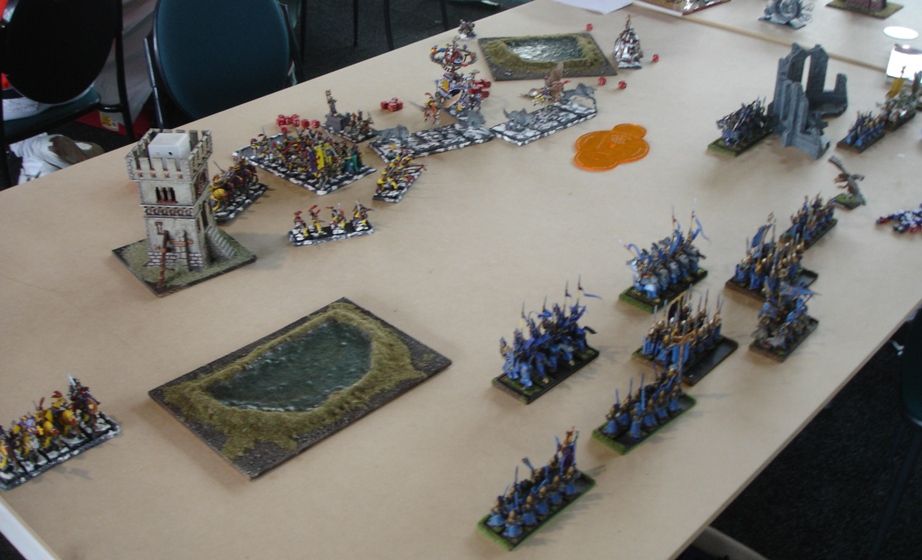
A lot depended on the rolls for particular regiments to see where they show up. Jerry won the roll off and deployed North.
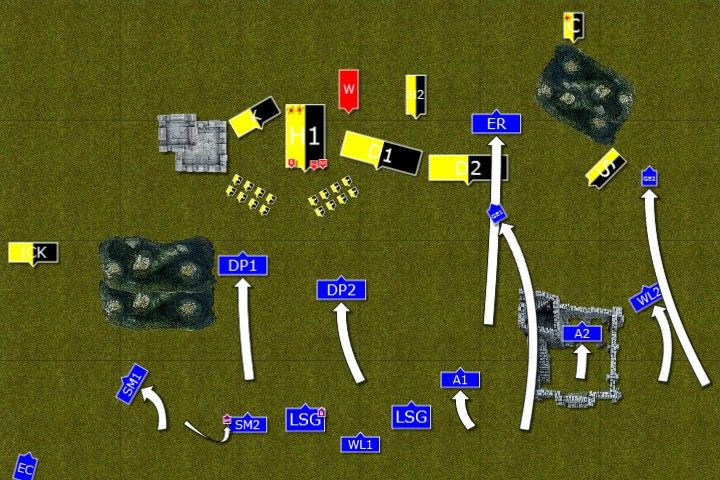
Deployment
 |
| Empire and High Elves meet at quite open battle field |
 |
| Deployment of armies after vanguard move |
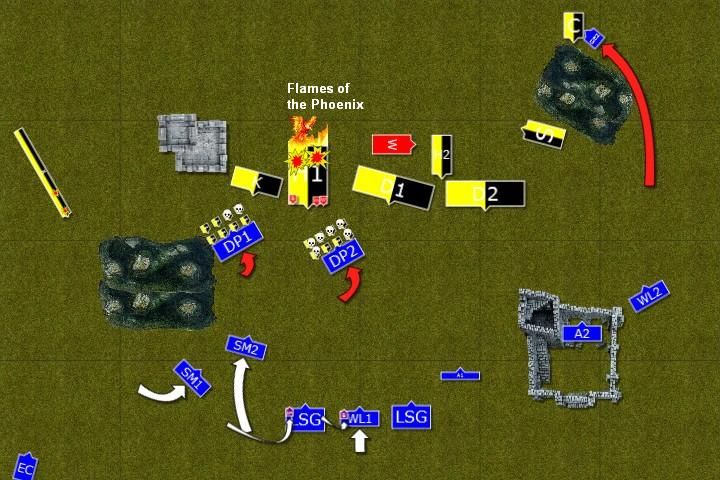
Apart from a tower and ruins nothing obscured line of sight. Two swamps were a problem for cavalry units but other than that the field was empty, probably favoring Empire army and its knightly regiments. Humans kept together and formed tight formation with only Inner Circle Knights ending up on the Western flank and Steamtank and a cannon on the East.
High Elves also had majority of units in the center with Swordmasters and Archmage on the West (as well as Eagle Claw) and Archers, Lions and Eagle on the Eastern Flank. High Elves tried to seize the initiative but the attempt failed.
Respective Wizards had following spells:
Wizard Lord - Awakening of the Woods, Flesh to Stone, Regrowth, The Dwellers Below
Wizard - Shem's Burning Gaze
Archmage - Drain Magic, Shield of Saphery, Fury of Khaine, Flames of the Phoenix, Vaul's Unmaking
Empire - Turn 1
 |
| Empire advances |
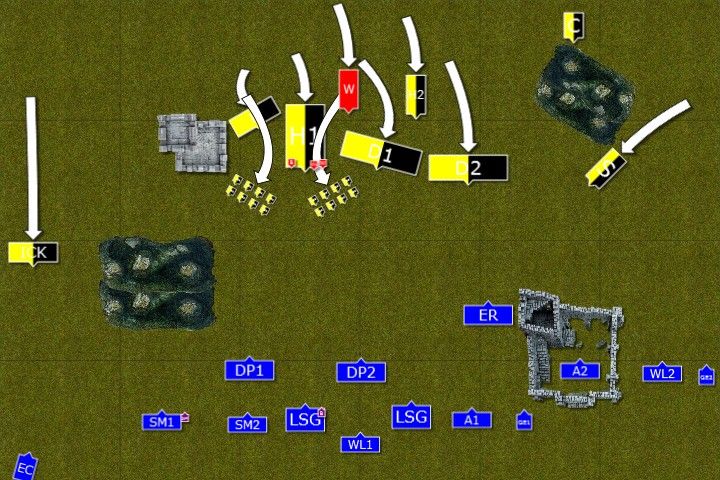 |
| Archers lead the way |
Empire army advances at a stead pace with Archers leading the way and forming protective screen. On the West the knights race towards the eagle claw while on the East Steamtank moves towards the center. Limited artillery available is not effective as yet.
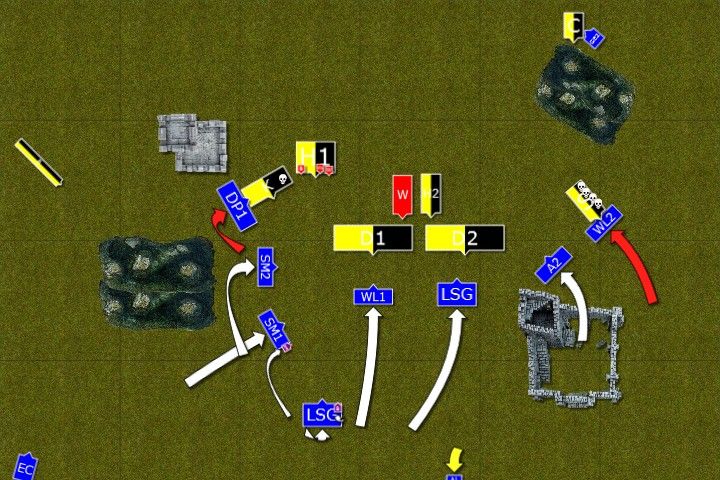
Outcasts - Turn 1
 |
| Cavalry moves forward |
 |
| While infantry awaits |
Swordmasters on the West move to intercept the Knights. Elven cavalry moves forward, with reavers using their speed to move around enemy ranks and directly threaten the cannon. One of the eagles blocks demigryphs so that they cannot charge exposed Dragon Princes.
Shooting proves to be inefficient as eagle claw failed to drop even single knight with their volley and other shooters focused on halberdiers. Only Archers on the Eastern flank did well when they killed one of the cannon crew.
Empire - Turn 2
 |
| Empire continues the steady advance |
 |
| And gets rid of some annoying enemy light troops |
Empire troops move forward again. Archers block Dragon princes and even one of them falls down due to lucky shot. Demigryphs kill the interfering eagle and Steamtank intercepts Ellyrian Reavers. Light mage kills handful of Archers but other attempts to cast magic are successfully dispelled.
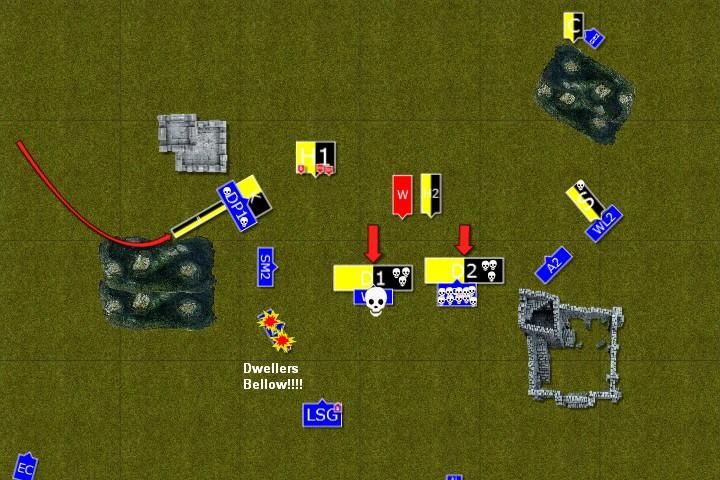
Outcasts - Turn 2
Outcasts - Turn 2
 |
| Jerry cheerfully explains the subtlety of his 6-dice Dwellers tactics :) |
 |
| Cavalry charge! |
Both cavalry units charge empire irregulars and both fail to break through! (Edit: I completely forgot about the detachment rules and upon failing to kill the archers on the charge, steadfast archers held heavy cavalry!) Great eagle swooped down to attack the cannon crew and they begun their quite long duel.
Single bolt from the eagle claw kills 2 inner circle knight but fails to penetrate more ranks.
Finally, Archmage got through Flames of the Phoenix and more than a half of the regiment died in magic flames. However, the survivors held the line under the stern eye of the BSB captain.
Empire - Turn 3
 |
| Empire keeps pressing forward |
 |
| Elven Cavalry in big trouble |
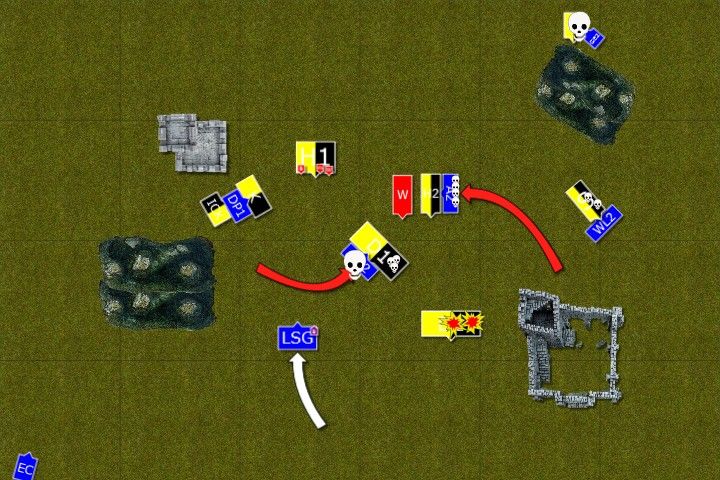
Demigryphs take the opportunity and charge pinned down elven knights, destroying them easily. All archers are however destroyed, also from the second unit, allowing Dragon Princes to reform conveniently.
Second unit of monstrous cavalry charges archers but they retreat. Steamtank goes towards the Lions but it was not particularly fast this turn.
Outcasts - Turn 3
Second unit of monstrous cavalry charges archers but they retreat. Steamtank goes towards the Lions but it was not particularly fast this turn.
Outcasts - Turn 3
 |
| High Elves decide on a gamble |
 |
| Charge or be charged |
Elves move more aggressively now. Dragon Princes charge the flank of the knights but imperial armor saves all but one and his companions held anyway. White Lions charged the steamtank and started to damage the steel behemoth but it was not easy.
Finally, two regiments exposed themselves to the charge in order to trap one demigryph unit and occupy second for a while.
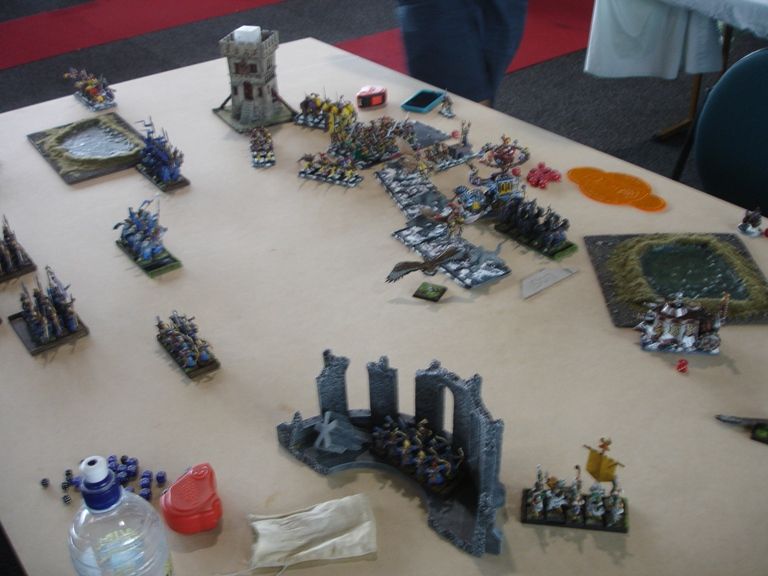
Empire - Turn 4
 |
| Empire steamroller breaks through |
 |
| Disaster! |
Empire troops charge! Dragon Princes find themselves attacked from both sides but hold. Demigryphs destroy sea guard at a cost of one of their numbers (Edit: I wounded the beast once before and with luck got one in combat) and 2 members manage to flee the destruction for a while. Second unit charges the Lions who kill one but are destroyed anyway.
Archmage blocked any attempt to help demigryphs, be it with spells or prayers but in doing so he left himself exposed and without strength to dispel the blow that cost him his life. Empire wizard cast Dwellers who claimed the archmage and entire unit of his Swordmasters (Edit: I failed all strength tests for that unit :()
The trap was shattered.
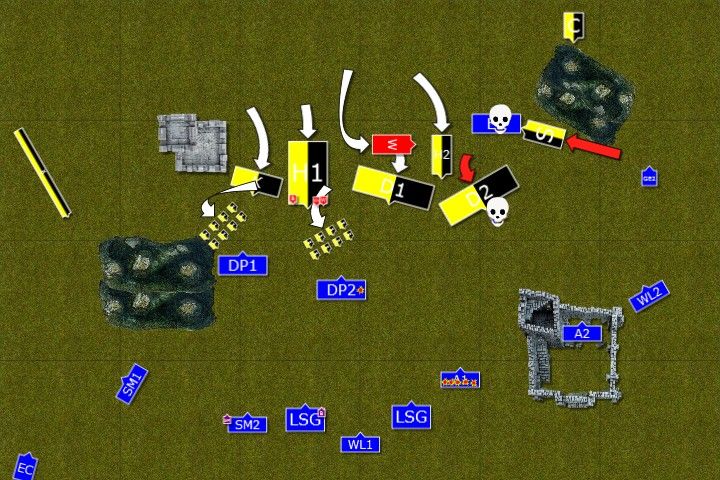
Outcasts - Turn 4
Archmage blocked any attempt to help demigryphs, be it with spells or prayers but in doing so he left himself exposed and without strength to dispel the blow that cost him his life. Empire wizard cast Dwellers who claimed the archmage and entire unit of his Swordmasters (Edit: I failed all strength tests for that unit :()
The trap was shattered.
Outcasts - Turn 4
 |
| Desperate counter-attack |
High Elves try to counter-charge but lose the unit for their trouble, as Swordmasters cannot penetrate the armor of the demigryphs. Archers recklessly charge the hurricanum, lose but hold. Lions fail to finish the tank but eagle manages to kill the crew. Finally!
Eagle claw crew aimed carefully and hit the flank of demigryphs. Single powerful bolt kills two outright but third and last beast survives.
It is clear that Empire carried the day and armies rapidly disengage.
After-battle thoughts
Empire army is my nemesis. To put up the fight I need to play very well, do not make mistakes and some luck is always required. I didn't play well, made mistakes and sometimes dice were not on my side so now wonder I lost 4-16. There are plenty of things I should have done better (and some other comments):
1. Deployment - it was not too bad but I should probably position the units further back so that Empire troops could not charge me turn 1. Also, keeping characters out of the range of Dwellers would be good idea. Jerry had a very good approach of casting a lot of dice for that spell to get IF and hopefully kill enemy characters as they were more expensive than his wizard (who was not his army general either).
2. Detachments - I could shoot them but I thought Dragon Princes can break them on the charge. I completely forgot about their rules and fell for the simple trap that cost me one DP unit and stopped the attack.
3. Reavers - I knew steamtank was nearby so I should probably have moved them to bait demigryphs. Or put an eagle in front of the tank (if I had enough of movement to do so) so that it could charge only the eagle. Reavers are more expensive and more efficient at war machine hunting.
4. Swordmasters - I should have moved them towards inner circle knights anyway. It would keep them busy and made the flank secure while eagle claw should have kept shooting single bolts as any volley was not strong enough to penetrate imperial armor. I also made a mistake with positioning. I had an opportunity to position the unit in the middle so that they could see both demigryphs and halberdiers. When disaster struck at least I had a chance to charge the infantry and claimed points for wizards.
5. Lions - I charged the steamtank and after initial success I simply was not efficient enough. It is T6 and has 4+ armor against them and can hold them if not grind them down. Jerry didn't risk it as it was already wounded but it served him well. Maybe better idea was to move lions to the flank of the demigryphs and block the tank with archers?
6. Archlector + Hurricanum - that is a very powerful combination, especially for demigryphs. My small infantry units have absolutely no chance to survive so I really need to come up with better ideas how to counter them. Maybe shoot at the hurricanum? On the other hand it was constantly obscured by monstrous cavalry so shooting at it was not that efficient.
7. Dwellers - It was good magic phase for Jerry. He got enough dice to force me to dispel other spells like Flesh to Stone and re-roll to wounds prayer (I think) so that my trap would have a chance to succeed. With T6 demis I would be in big trouble. My plan was to sacrifice Lions and kill one in doing so, then charge both Swordmaster units against them and hopefully kill another 2, win combat and break through to get the hurricanum and open the path to halberdiers. Hence I had no dice left to dispel dwellers which went off on 4 dice. Then luck deserted me completely and I failed any single strength test losing archmage and his unit in one go.
Jerry played solid game and deserved to win. I learned a lot during that game although I am not sure if my lessons are going to help me much against Empire. Maybe I will at least have a chance not to lose that much :D
Thanks for reading!
No comments:
Post a Comment