Greetings!
This game was postponed a few times but fortunately we managed to play it eventually. So a rematch against Skaven and Watchtower scenario too! So much can depend on a single dice roll in this game. :)
Army Lists and Pre-battle considerations
The army lists didn't change from our previous battle, although my opponent was considering some improvements. In the end, as the game was postponed a few times and an opportunity presented itself in the last moment he decided to use his previous army list rather than make changes and add too much to the confusion :) So the lists just for reference.
Despite that the scenario requirements meant I had to approach this game differently. First, I needed some plan for both options, i.e. when I can occupy watchtower from the start and when it was my opponent to garrison it first. I noticed that his units are too big to do so and only one unit of slaves was small enough as watchtower guardians. This would give me a good opportunity to replace them with some unit of my own on turn 1 and if that were the case I would assign Swordmasters with Bladelord to do so.
If I won the roll off I would place one unit of Spears there and maybe change the garrison with Swordmasters later on. Regardless of the fact who is going to start the game I still wanted to go for a weighted flank and use watchtower as an anchor. I think it would give me an advantage and with more deployment drops I also wanted to create some hunting parties to take down Abomination and Doom Wheel as soon as possible.
Skaven - Army List
Grey Seer, Screaming Bell, Dispel Scroll - Lore of Ruin
Cheiftain, Poison Attacks, Halberd
Cheiftain, BSB, Storm Banner
Engineer, Warp Energy Condenser, Level 1 - Lore of Ruin
Engineer, Doomrocket
Engineer, Brass Orb
40 Clanrats, Full Command
40 Slaves, Musician
40 Slaves, Musician
20 Slaves
5 Giant Rats, Packmaster
5 Giant Rats, Packmaster
30 Stormvermin, Full Command, Banner of Eternal Flame
6 Gutter Runners, Poison, Slings
6 Gutter Runners, Poison, Slings
3 Jezzails with champion
Warplightning Cannon
Warplightning Cannon
Doomwheel
Hellpit Abomination
Outcasts - Army List
Archibald the Archmage, Level 4, Annulian Crystal, Dragon Bane Gem - High Magic
Bob the BSB, Dragon Armour, Shield, Great Weapon, Radiant Gem of Hoeth - High Magic
20 Spearelves, Musician, Standard,
20 Spearelves, Musician, Standard
10 Archers, Light Armour, Musician
10 Archers, Light Armour, Musician
10 White Lions, Musician, Standard, Banner of Eternal Flame
10 White Lions, Musician
9 Swordmasters, Blademaster with Amulet of Light, Musician
8 Swordmasters, Musician
8 Swordmasters, Musician
5 Dragon Princes, Musician
5 Dragon Princes, Musician
5 Ellyrian Reavers, Musician, Bows, Spears
Great Eagle
Great Eagle
Deployment
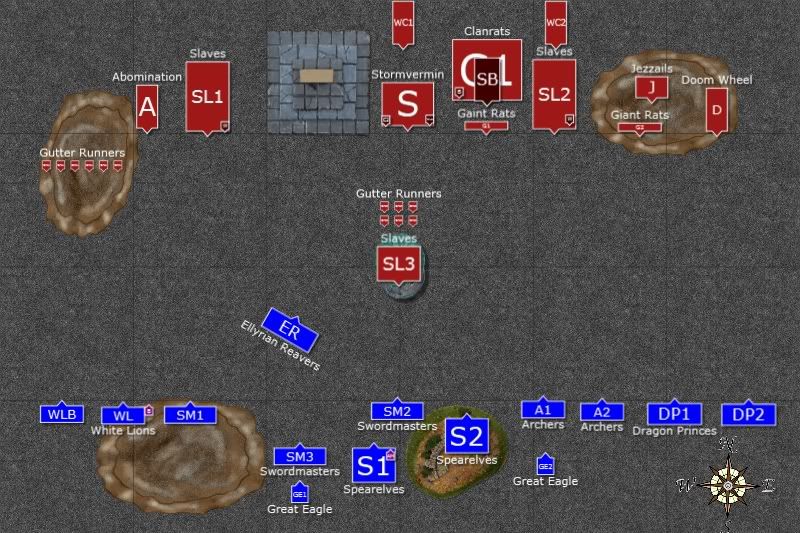 |
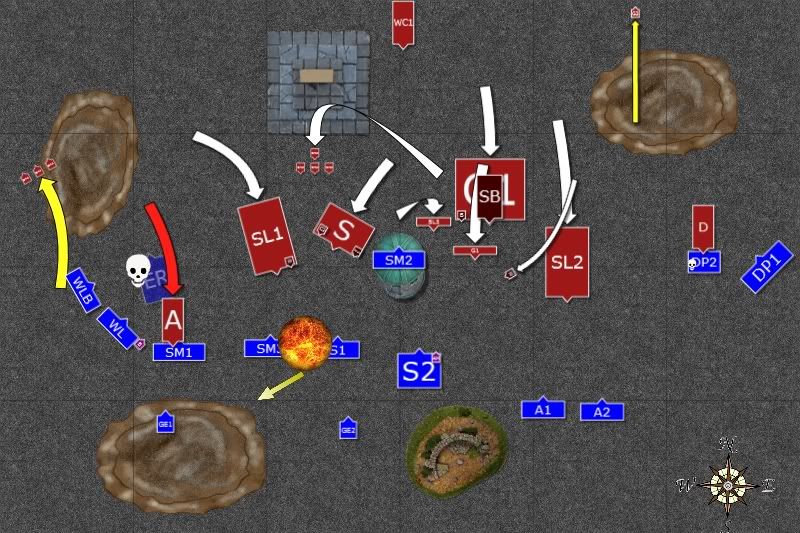
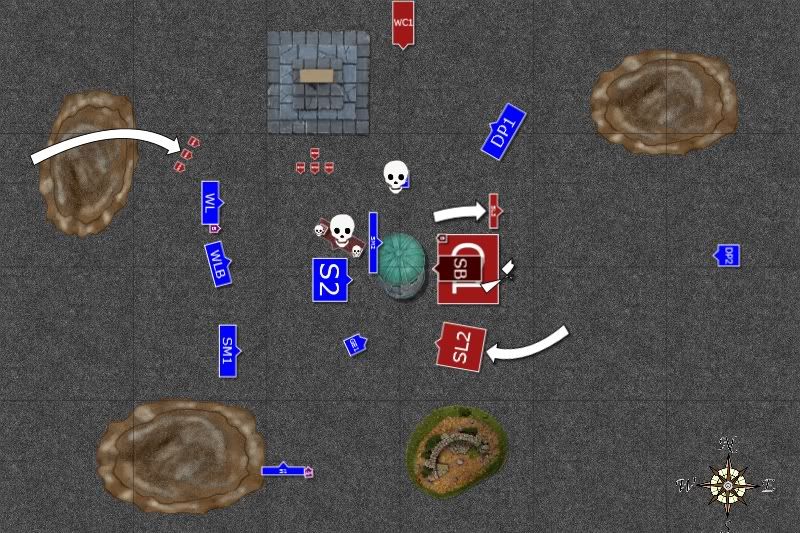
| Armies arrayed for battle after vanguard move and scouts placement |
Grey Seer took Lore of Ruin this time and got following spells: Skitterleap, Death Frenzy, Scorch and Dreaded 13th while Warlock got his usual Lightning. Two engineers joined their Slaves units, Chieftain and Warlock were with Stormvermin while Grey Seer and BSB led big clanrat unit.
Elven BSB had his usual Drain Magic, Shield of Saphery combination while Archmage got: Drain Magic, Shield of Saphery, Fury of Khaine, Flames of the Phoenix, Vaul's Unmaking
Very good spells selection on both sides. As it is clear from the deployment picture Skaven won roll off to see who controls Watchtower but High Elves got first turn and went for aggressive opening!
Outcasts - Turn 1
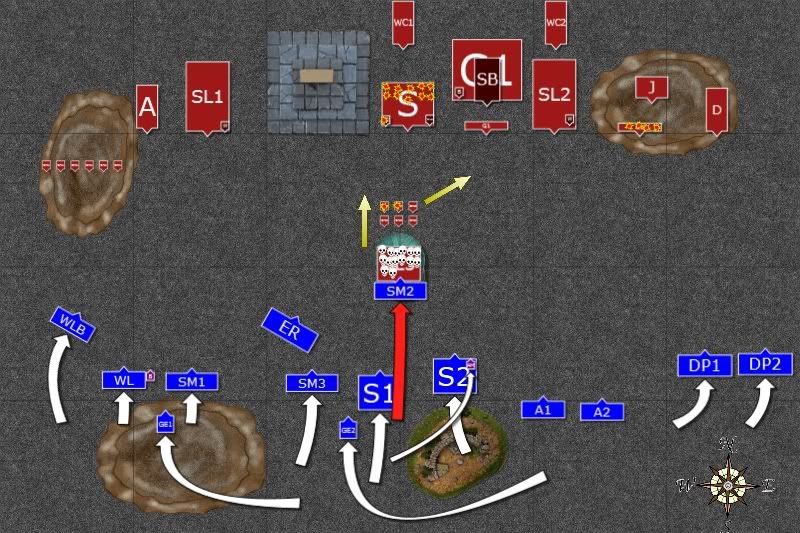 |
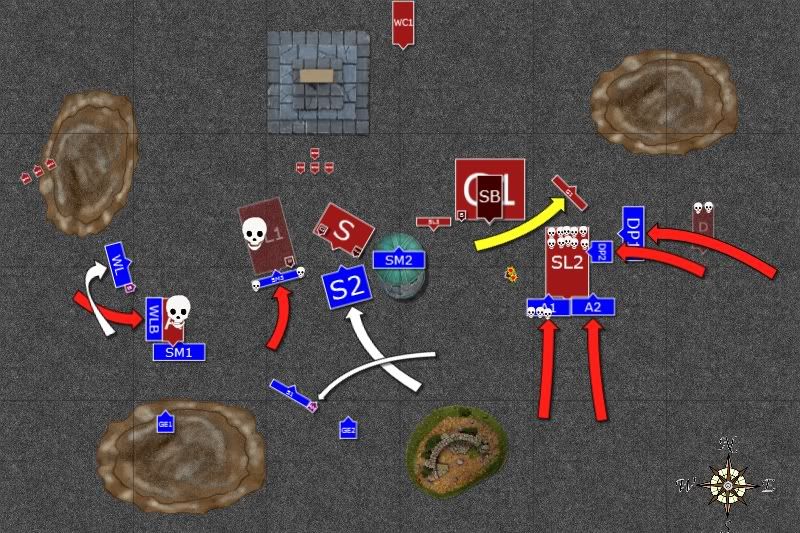
| High Elves seize the initiative with an attack on Watchtower |
High Elven units moved forward, each perfectly remembering detailed plans prepared by their commanders. On the West, hunting party of White Lions with support of Swordmasters moved towards Abomination but only the regiment with Banner of Eternal Flame moved close enough to be charged by the monster. Units in the center shifted their position to the West while two heavy cavalry squadrons moved to positions where they could intercept Doom Wheel.
The Bladelord led his companions in the assault team and attacked slaved hiding in the Watchtower. The bloody combat erupted and despite warnings, treats and curses shouted by Grey Seer a few survivors fled the tower and Elves reclaimed it swiftly (Edit: that unit probably should have exploded as slaves usually do :)) That was not the end of the troubles for Grey Seer, however. Two Gutter Runners were killed by very accurate shots from elven light cavalry and they too fled! Grey Seer was fuming on the top of his Screaming Bell platform and that was probably the reason why he was distracted and could not dispel Flames of the Phoenix cast at Stormvermin. Elite ratmen lost 1/3 of their numbers but firmly held. Elven Archmage used the opportunity and cast Shield of Saphery on western Lions and then used his power of Drain Magic to dissipate magical energy too.
Giant rats on the East were a target of both archer units but they could not kill all the rats (and didn't inflict panic tests nearby) who also were very brave and despite the loss of pack master stayed firm.
Skaven - Turn 1
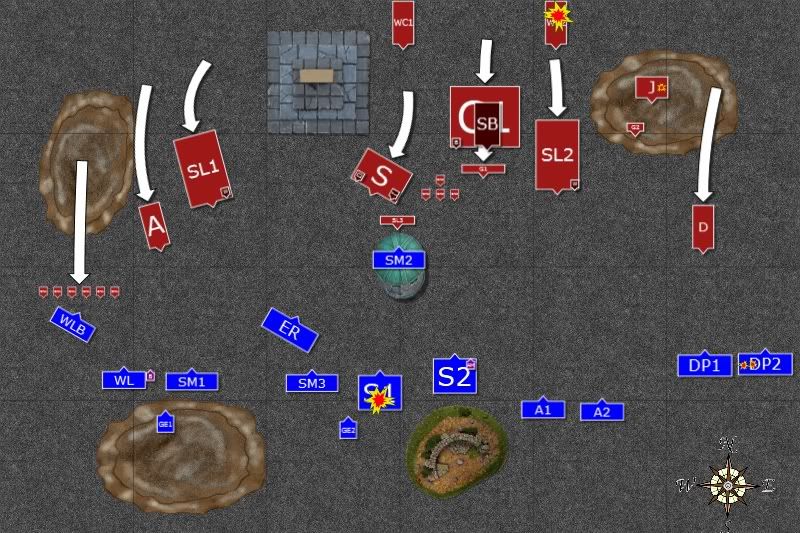 |
| Skaven move forward to secure area around the tower |
Angry Grey Seer shouted orders and his army obeyed quickly. Fleeing units rallied. Gutter runners on the West blocked White Lions while Abomination moved forward with Slaves in support. The rest of the army moved slowly to surrender the watchtower and block other elven units to help the garrison. On the East Doom Wheel moved towards elven cavalry and the engineer tried to make his machine to work properly and he managed to kill 2 Dragon Princes. Jezzails on the hill also aimed at the knights but their ammunition was flawed and one of the guns exploded in the paws of skaven marksmen killing him and his pavise bearer on the spot. The similar fate waited one of the crew of Warp Lightning Cannon which vanished in the spectacular display of green light. Second crew worked frantically to re-adjust the settings and saved themselves from the similar end but their shot, although aimed perfectly at the Eagle, was just a harmless green beam in the end.
Grey Seer could not believe that traitors from clan Skryre dared to cheat the greatest hero of the Skavendom! He will have their skins later. Now he urged his Rat Ogre to swing the bell and he focused on summoning some energies to cast spells. The end result was many scorched elves from Sears regiment. Content he has shown his useless engineers how things should be done Grey Seer dispelled Flames of the Phoenix in a rare display of mercy (and a need for proper fighting unit in big enough numbers!).
Outcasts - Turn 2
 |
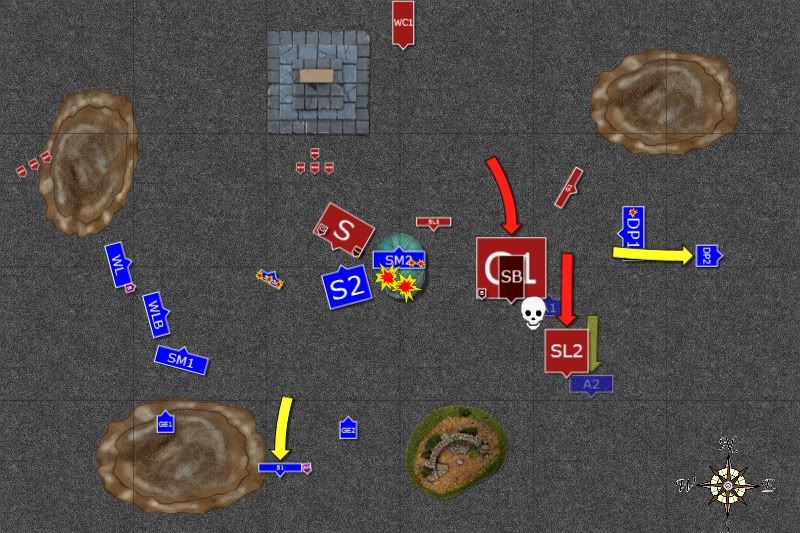
| In the middle of the Storm deadly dance begins |
Elven units charge on both flanks. On the East smaller unit of Dragon Princes attacks Doom Wheel while their companions move to the flank to lend some support soon. The wretched machine is too tough to wound, however, and engineer manages to control it. Can the Knights hold enough for their brothers to come to the rescue?
On the West white lions charge gutter runners and kill three. Despite the superb dodging abilities of skaven assassin adepts the survivors are not that brave and flee. Victorious Lions reform to face their true prey while other units set up a trap. It means, unfortunately, that somebody has to make a noble sacrifice to lure the monster into it and Reavers perform that duty.
Despite the raging Storm Archers manage to kill both remaining Jezzails and single surviving giant rat flees to the safety of some tunnels, never to be seen again. With weak winds of magic Archmage drains the energy even more so that his enemy cannot cast deadly spells either.
Skaven - Turn 2
 |
| Skaven press forward! |
It is time for some Skaven counter-attacks. Abominations destroys light cavalry to an elf and overruns into Swordmasters. Elven elite stays firm and it seems they managed to trap the monster yet again. It remains to be seen, however, if the trap is strong enough to kill it quickly. On the opposite flank engineers presses all the buttons and twists all the gears but to no avail. Only one knight fell and his two companions kept fighting. Skaven engineer became more and more nervous as he saw another cavalry unit leveling their lances and about to charge his flank.
Other units moved forward again, Stormvermin and Slaves securing the western flank of the watchtower while clanrats and other slaves blocked the eastern side. Grey Seer could not summon enough energy to breach elven magical defenses and his bell encouraged his army. Raging Storm blocked the sight to any target and cannon crew didn't try to shoot this time. However, lone figure emerged from the ranks of slaves and fired some rocket-like device. In the resulting explosion 2 Swordmasters and a few Spearelves fell. The survivors decided to perform tactical retreat since they were already depleted below proper combat strength.
Outcasts - Turn 3
 |
| High Elves go for exchange of blows |
High Elves press even harder on both flanks. On the West White Lions attack the flank of the Abomination already pinned down by Swordmasters, who lost only one of their numbers due to impact hits. White Lions stroke with ferocity of the most savage beasts of Annuli Mountains and the monster was dead before it managed to inflict any more damage. The hunting party of 3 elite regiments re-arranged their formation and were ready to march towards the tower to support the garrison.
At the same time depleted Swordmaster regiment engaged skaven slaves and when it was clear that White Lions are still a little too far away to lend immediate support they swung their blades alone. Despite much bigger numbers skaven slaves fled, being just out of range of Grey Seer and his inspiring presence! Only 3 of warriors of Hoeth remained alive but it looked like western flank is clear and secure.
On the East Dragon Princes charged the Doom Wheel and although in the end only 2 wounds were inflicted it was enough to break the engineer who fled right into Slaves. Pursuing Knights destroyed it and smaller regiment hit the flank exactly at the same time when both archers units engaged from the front. Many slaves died but they held despite that.
Elven Archmage decided to avenge his fallen comrades and sent fury of khain against lonely engineer who died instantly, panicking nearby giant rats. Elves clearly managed to envelope the enemy but Skaven are still strong enough to inflict a lot of damage.
Skaven - Turn 3
 |
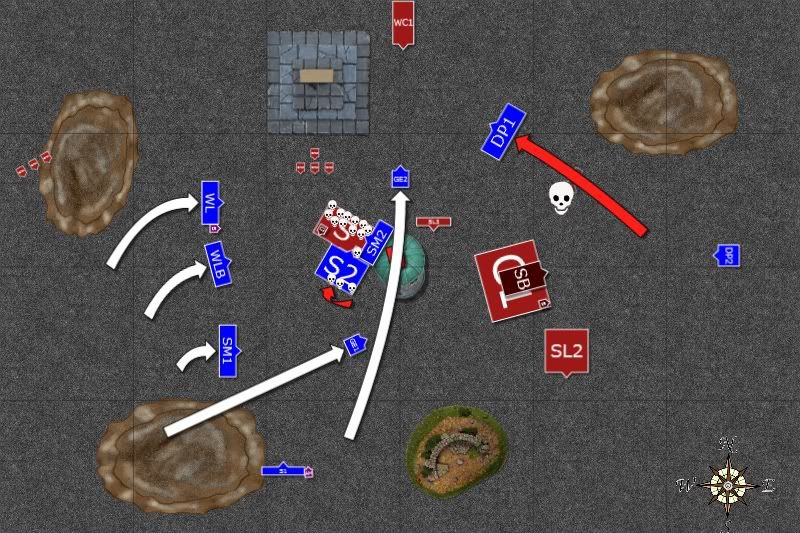
| Skaven break through the encirclement |
Grey Seer ordered an attack and clanrats pushed his bell against elven Archers. This time elves lost entire unit and the second archers and dragon princes both broke from combat. Slaves pursued and caught elven bowmen while clanrats reformed to face another cavalry unit.
Before Grey Seer summoned his powers the bell rang again and ... the watchtower collapsed in an instant! Swordmasters were quick enough to jump out of the windows but two of them were buried in ruins. Had Grey Seer known the future he would probably order his clanrats to move towards the ruins instead and now he was facing the wrong direction!
Gutter runners aimed at brave Swordmasters and killed them to an elf with their poisonous sling shots. That panicked Spearelves who decided to take the Archmage to safety too, just in case. It seemed that eastern front was where Skaven were winning.
Outcasts - Turn 4
 |
| High Elves are gaining upper hand |
Suddenly released from their garrison duty Swordmasters charged the exposed flank of Stormvermin while Spearelves press from the font. 13 elite ratmen lie dead in no time but the remaining few with a chieftain and engineer show insane courage and hold against all odds!
As the storm finally stopped all units move quickly and especially eagles take flight to treat the cannon and be closer to the main fights. Dragon Princes elect to charge giant rats, break through easily and overrun towards the cannon too. Their companions on far East rally as do the spearelves with Archmage. There is one more gamble left for Grey Seer to get back to the game!
Skaven - Turn 4
 |
| The final act |
Grey Seer urges his unit and nearby slaves to close towards the ruins of the watchtower. Gutter runners manage to kill the eagle before it attacks the cannon but its fate is sealed with the cavalry so close.
Brave Stormvermin, their Chieftain and last Warlock all die to a rat and victorious Swordmasters and Spearelves reform to face Grey Seer himself. With evil laughter, the chosen of the hornet rat summons great powers and winds of magic are really strong. But by the ironic twist of fate the whole energy escapes at the first attempt of casting low level, Skitterleap spell and the whole gamble went for nothing. (Edit: While casting Skitterleap grey seer rolled double 1's and that effectively ended magic phase)
Seeing that nothing can be done and that he is in a grave danger Grey Seer ordered his last regiments to withdrew while they could and thus High Elves were victorious once again.
After-battle thoughts
Although I am very happy to win against Skaven once again and also in the Watchtower scenario I must admit my opponent was very unlucky this time. He rolled 4 misfires, one resulting in explosion of the cannon, twice to turn his cannon shots into harmless green flash lights and once for doom wheel when it was in combat. His Jezzails performed in a similar fashion and in general his magic was not good enough to either get proper casting values (drain magic did help a lot especially against warlock).
His idea was to surround the tower and cast dreaded 13th on the garrison, turn it into rats and thus control the tower. Unfortunately the tower collapsed and gave me the opportunity to charge his Stormvermin. If he only knew it is going to happen and that they are gong to hold he would reform his bell unit differently and charged my units from the rear. Of course I still had Dragon Princes and would attack him to pin him down but then maybe I would not be able to do so.
I wonder if he would not be better with refused flank. I would deploy the wheel and abomination close to each other on the East and then move forward. Or even position Abomination behind Stormvermin so it is not charging unsupported and too early. It was a little unlucky to lose his slaves as tower garrison (they were testing on 7 and failed with re-roll) and since he wanted to cast dreaded 13th on the regiment I put there he probably didn't want to assault it with Stormvermin. Besides they would die as easily as slaves in doing so.
As always it is difficult to say what could be done better when one wins the game :) I am really pleased with my units on flanks as they performed their tasks perfectly. Magic was working in a subtle way, usually adding that drain magic into equation preventing engineer from casting the lightning and making casting 13th very risky. However, I was pre-occupied with casting damage spells so much that I forgot about Unmaking! I could force him to dispel fury and flames and then cast unmaking. That might have destroyed the rocket before it was used (although I didn't suffer as much as I could because of that).
I guess my charge with Archers was not necessary. I could simply move them apart and either hold against slaves charge and then counter attack with second unit or even flee from them. Instead I allowed his units to break through. The good thing was that this led them further away from the tower so maybe it was not that bad in the end.
There was also one situation I would like to ask your opinion on. When doom wheel fled it rolled 10" while both DP units got 9" each. So they could not catch it. But it fled into slaves and apparently it has to stop 1" away from the unit, meaning it was fleeing 9" in total - hence we ruled that out as if DP caught it in pursuit anyway. Is that a correct way? I am browsing the rule book at the moment but I would like to know what do you think about it.
Ok, that's all from me today, thanks for reading and I hope you enjoyed it. As always we are looking forward any comments!
Cheers!
No comments:
Post a Comment